Yoga for hip strength and flexibility is life-changing because hip strength and flexibility help improve your overall motility, decrease back pain, and facilitate other yoga poses that may have been inaccessible.
How to Use Yoga for Hip Strength and Flexibility
The way I like to use yoga for hip strength and flexibility is a combination of passive and active stretching as well as some mobility drills added to the mix. In today’s follow-along videos, you will find various hip opening and strengthening drills that will target your hip flexors, hip abductors, hip adductors, and even your hamstrings.
As with anything, consistency is key. If you need help with staying consistent, you will benefit from my 5-Day Yoga Habit Challenge.
Hip Openers
Let’s start with some of the hip openers we will be practicing today.
Hip opening exercises inspired by yoga can help improve flexibility and mobility, and relieve tension in the hip area. Here are some effective hip-opening yoga poses you can try:
- Pigeon Pose (Eka Pada Rajakapotasana):
- Start in a tabletop position (hands and knees).
- Bring your right knee forward and place it behind your right wrist.
- Extend your left leg straight back and lower your hips toward the floor.
- Keep your hips square and fold forward over your right leg.
- Hold for 30 seconds to 1 minute, then switch sides.
- You can use the Pigeon Pose for hip strength by staying upright and scissoring your legs together (try not to support yourself with your hands; place your hands on your hips). You will find this exercise and more in my Yoga for Glute Strength: Yoga Poses to Lift Your Booty! workout.
- Butterfly Pose (Baddha Konasana):
- Sit with a straight back and bring the soles of your feet together, allowing your knees to fall out to the sides.
- Hold your feet with your hands and sit tall.
- Gently press your knees toward the floor to deepen the stretch.
- Hold for 1-2 minutes, breathing deeply.
- If you enjoy hanging out in those passive hip openers, you will enjoy 5 Efficient Stretches for the Middle Splits (With Proven Tips).
- Wide-Legged Forward Bend (Prasarita Padottanasana):
- Stand with your feet wide apart (about 3-4 feet) and parallel to each other.
- Hinge at your hips and fold forward, bringing your hands to the floor or blocks in front of you.
- Keep your spine straight and lengthen your torso.
- Hold for 30 seconds to 1 minute.
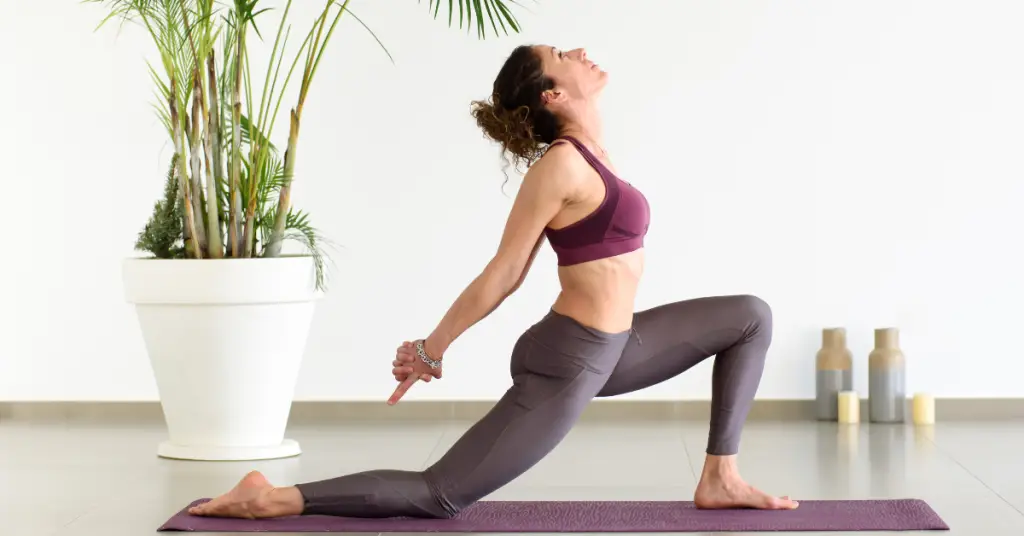
- Lizard Pose (Utthan Pristhasana):
- From a high plank position, step your right foot forward to the outside of your right hand.
- Lower your left knee to the floor if needed, and keep your back toes curled.
- Sink your hips down and forward, feeling the stretch in the right hip flexor.
- Hold for 30 seconds to 1 minute, then switch sides.
- Frog Pose (Mandukasana):
- Start by kneeling on the floor with your knees hip-width apart. Your wrists should be aligned with your shoulders, and your knees aligned with your hips.
- Spread your knees wider apart while keeping your big toes touching. Your shins and feet should be parallel to each other.
- Gently start to lower your hips toward the ground. Depending on your flexibility, your hips might not touch the ground, and that’s okay. The goal is to feel a comfortable stretch in your inner thighs and groin area.
- Hold for 30 seconds to 1 minute.
Yoga Hip Openers for Beginners
If you are a beginner, you can modify most of the hip openers we mentioned with blocks, a strop, or simply by not going as deep in the stretch. You may also particularly enjoy the Reclining Bound Angle Pose (Supta Baddha Konasana) pose:
- Lie on your back and bring the soles of your feet together, allowing your knees to fall out to the sides.
- Support your knees with blocks or cushions if needed.
- Relax and breathe deeply, feeling the stretch in your hips and inner thighs.
- Place yoga blocks on the inside of your thighs near your knees for more resistance if you would like.
- Stay in this pose for 1-2 minutes.
- Check out this tutorial for more help.
Yoga Strap Hip Openers
Here’s a short but effective routine that you can follow if you are looking for hip openers with a strap.
- Reclined Big Toe Pose (Supta Padangusthasana) with Strap:
- Lie on your back with your legs extended.
- Loop the yoga strap around the ball of your right foot and hold the strap with both hands.
- Inhale, and as you exhale, gently draw your right leg closer to your torso using the strap.
- Keep both legs active by flexing your feet and pressing through your heels.
- Make sure to keep your left leg grounded on the floor throughout the stretch.
- Hold the stretch for about 1 minute, breathing deeply and relaxing into the sensation.
- Repeat the stretch on the other leg by switching the strap to your left foot.
- Bound Angle Pose (Baddha Konasana) with Strap:
- Sit on the floor with your legs extended straight in front of you.
- Loop the yoga strap around the balls of your feet, then cross the strap and hold each side with your hands.
- Bend your knees and bring the soles of your feet together, allowing your knees to fall out to the sides.
- Hold the strap with a comfortable grip, and as you exhale, gently press your knees toward the floor using the strap.
- Keep your spine long and avoid rounding your back.
- If you find it challenging to keep your back straight, you can sit on a cushion or yoga block.
- Hold the stretch for 1-2 minutes, breathing deeply and relaxing into the stretch.
- Revolved Head-to-Knee Pose (Parivrtta Janu Sirsasana) with Strap:
- Start in a seated position with your right leg extended straight, your left knee bent, and your foot on the floor.
- Loop the strap around the arch of your left foot and hold it with both hands.
- Inhale and lengthen your spine, then exhale as you twist your torso to the left, bringing your chest and abdomen over your left leg.
- Place the strap over your left shoulder and behind your back, holding it with your left hand on the outside of your left hip.
- Reach your right hand down the inside of your left leg, aiming to hold the outside edge of your left foot with the strap.
- Use the strap to maintain the twist and forward bend as you exhale and deepen the stretch, bringing your head closer to your left knee.
- Hold the pose for about 1 minute, breathing deeply and maintaining the twist and forward bend.
- To leave the pose, release your grip on the strap and slowly return to the starting position.
- Repeat the same steps on the other side, bending your right knee and twisting toward your right leg.
Using a strap in these poses can help you deepen the stretch and maintain proper alignment, especially if you have limited flexibility or want to focus on a specific area of your body (like we do in the Revolved Head-to-Knee Pose). For more ways to use a yoga strap, read 10 WAYS YOGA STRAPS CAN DEEPEN YOUR PRACTICE, and This Is How to Use a Yoga Strap In 6 Common Yoga Poses (Photo Tutorial).
Hip Strengthening Exercises
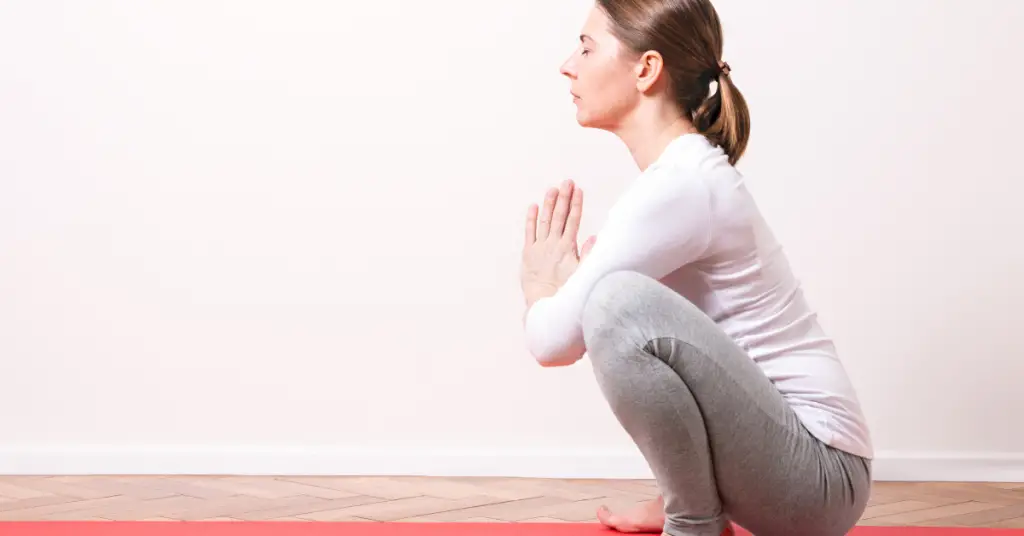
- Yogi Squat (Malasana):
- Start by standing with your feet slightly wider than hip-width apart.
- Turn your toes slightly outward, and as you exhale, bend your knees to come into a squat position.
- Lower your hips toward the floor, trying to bring them close to your heels.
- Bring your palms together at your heart center, using your elbows to gently press your knees apart.
- Lengthen your spine and keep your chest lifted.
- You can also place a folded blanket or cushion under your heels if they don’t comfortably touch the ground.
- Hold the Yogi Squat for 30 seconds to 1 minute, breathing deeply and relaxing into the stretch.
- Skandasana (Side Lunge Pose):
- Start in a wide-legged standing position with your feet wider than shoulder-width apart.
- Turn your right foot out to the side, and as you exhale, bend your right knee to come into a lunge on the right side.
- Keep your left leg straight and actively engage your left foot.
- Lower your hips down toward the floor, and you can keep your hands in prayer position at your heart center or place them on the floor for support.
- Hold the Skandasana for 30 seconds to 1 minute, then come back to the center and switch to the other side.
- Half Moon Pose (Ardha Chandrasana):
- Start in a standing position with your feet together.
- Take a big step back with your left foot and place your left heel on the floor, keeping your toes pointing slightly outward.
- Shift your weight onto your left foot and bring your right hand to the floor or a block on the inside of your right foot.
- As you exhale, lift your left leg parallel to the ground and extend your left arm toward the ceiling, creating a straight line from your left fingers to your left foot.
- Engage your core and keep your hips stacked.
- Hold the Half Moon Pose for 30 seconds to 1 minute, then come back to standing and switch to the other side.
- Boat Pose (Navasana):
- Start by sitting on the floor with your knees bent and feet flat on the ground.
- Lean back slightly, engage your core, and lift your feet off the floor, balancing on your sitting bones.
- Keep your spine straight and extend your legs forward, bringing them to a 45-degree angle from the ground.
- Reach your arms forward alongside your legs, parallel to the ground.
- If you find it challenging to keep your legs straight, you can bend your knees slightly.
- Hold the Boat Pose for 30 seconds to 1 minute, breathing deeply and keeping your core engaged.
These poses can be practiced individually or as part of a yoga sequence. Remember to approach each pose with mindfulness and listen to your body, making modifications as needed to suit your level of flexibility and strength
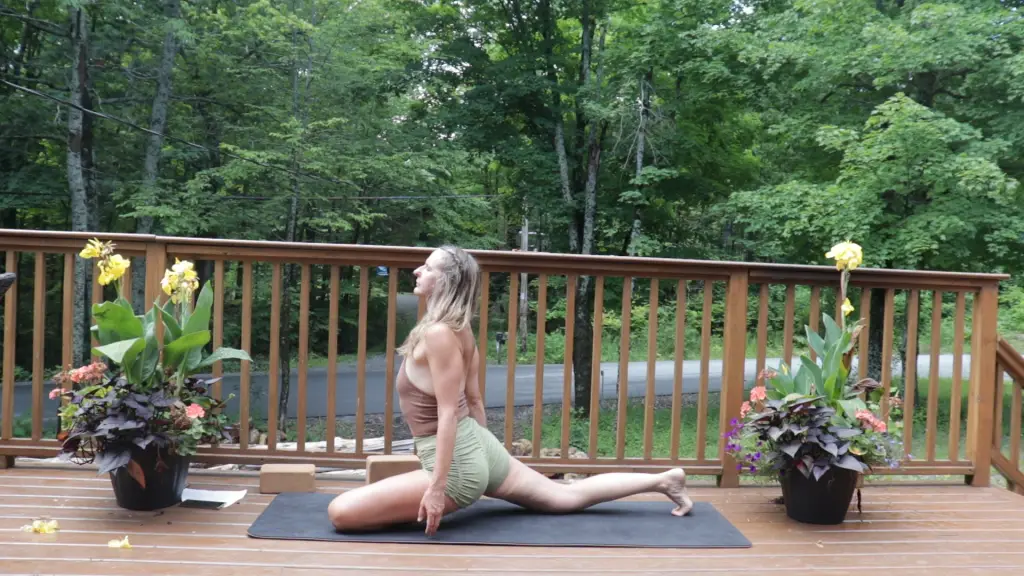

Here using both active and passive pigeon pose for hip opening and strengthening
Yoga Poses to Strengthen Hip Abductors
The key to strengthening your hip abductors in yoga is to always pull your energy toward the midline. Say you are in lizard pose, that bent knee is pulling towards your shoulders. Also, your yogi squat and side lunge are excellent options.
Hip Adductor Strengthening Drills
I have two favorite hip adductor strengthening drills: the standing leg raise and standing leg pulses.
Let’s take a look at each pose:
1. Standing Leg Raise:
- Stand tall with your feet together and arms by your sides (Mountain Pose or Tadasana).
- Shift your weight slightly onto your left foot while keeping the right foot grounded.
- Activate your core for stability and support.
- Inhale as you slowly lift your right leg forward, keeping it straight and engaged.
- Aim to lift your leg as high as you can while maintaining a straight back and not leaning backward.
- Hold the raised leg position for a breath or two.
- Exhale as you gently lower your right leg back to the floor.
- Repeat the movement on the same leg for several repetitions, then switch to the other leg.
Tips:
- Keep your standing leg slightly bent to avoid locking your knee.
- Find a point of focus (drishti) to help with balance.
- Engage your core and imagine a line of energy extending through the crown of your head and the lifted foot.
- For more hip mobility help, check out How to Increase Hip Mobility: Try These Drills!.
2. Standing Leg Pulses:
- Stand tall with your feet together and arms by your sides (Mountain Pose or Tadasana).
- Shift your weight onto your left foot while keeping the right foot grounded.
- Inhale as you lift your right leg forward, similar to the Standing Leg Raise.
- This time, instead of holding the leg raised, begin to pulse it up and down in small, controlled movements.
- Keep the movement relatively small and controlled to maintain balance and stability.
- Perform the pulses for a set number of repetitions or a specific duration.
- Exhale as you gently lower your right leg back to the floor.
- Repeat the pulses on the same leg for several repetitions, then switch to the other leg.
Tips:
- Engage your core and keep your hips stable throughout the pulses.
- Try to keep your upper body relaxed and your breath steady during the movement.
- Avoid swinging your leg; the movement should be controlled and intentional.
Both of these exercises are excellent for strengthening the standing leg, and hip flexors, and improving balance. They can be practiced as part of a yoga warm-up, or standing sequence, or incorporated into your regular yoga practice to build lower body strength and stability.
Hip Flexor Strengthening Drills
I created a full-length Crazy Effective Hip Flexor Strengthening Exercises Routine but today, we will only do a few of my favorite drills:
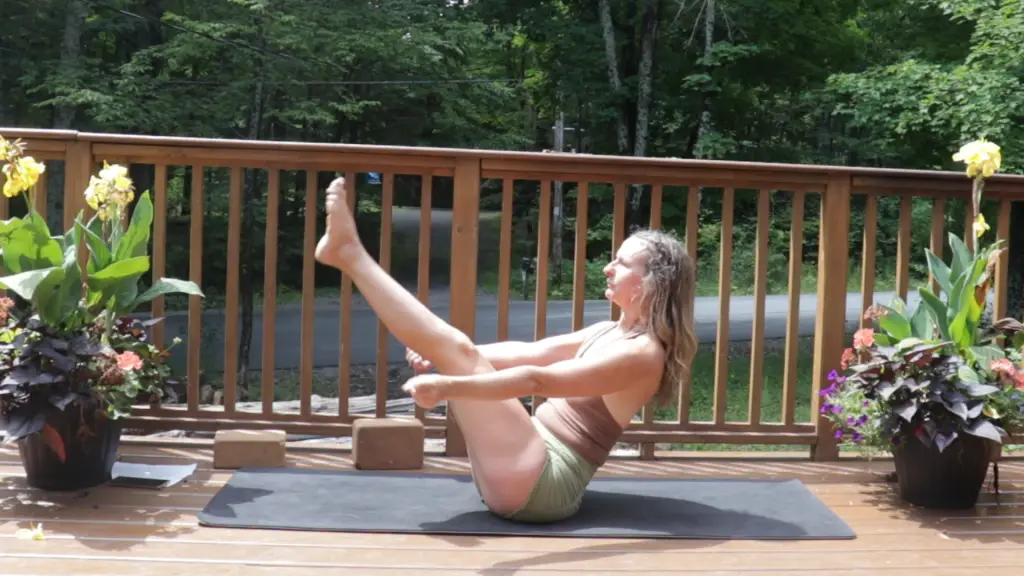
Here’s how to perform the Seated Pike Lift Drill:
- Starting Position:
- Sit on the floor with your legs extended straight out in front of you.
- Keep your legs together and your toes pointed.
- Hand Placement:
- Place your hands on the floor beside your hips, fingers pointing forward.
- Press your palms firmly into the ground to support your upper body.
- Engage the Core:
- Activate your core muscles by drawing your belly button in toward your spine.
- Keep your back straight and your chest open throughout the exercise.
- Lifting Movement:
- As you inhale, engage your core and lift your legs off the ground.
- Aim to lift your legs as high as you can while maintaining a straight back and engaged core.
- Your torso and legs should form a V shape (hence the name “Pike Lift”) at the top of the movement.
- Lowering Phase:
- As you exhale, lower your legs back down to the starting position with control.
- Try to avoid letting your feet slam down to the ground; instead, lower them gently and with control.
- Repeat:
- Repeat the lifting and lowering movement for the desired number of repetitions or for a set amount of time.
Tips:
- Keep your shoulders relaxed throughout the exercise, and avoid shrugging them up toward your ears.
- Focus on using your core strength to lift your legs, rather than relying solely on momentum.
- Maintain a slow and controlled pace to get the most out of the exercise and prevent strain or injury.
Variations:
- To make the drill more challenging, you can hold a yoga block or a small weighted object between your feet during the lifting phase.
- For a gentler variation, you can perform the drill with your hands slightly behind your hips to provide more support.
The Seated Pike Lift Drill is an effective way to target the core and lower body muscles while also working on hip flexibility. Today, we will do this drill with your legs closed and opened wide.
Yoga for Hip Strength and Flexibility Video Routine